Implementing Form Validations with Remult: A Practical Guide
Simplifying Client and Server Validation, and Managing Date Fields

👩💻 Full Stack Developer | 🎙️ Podcast Host @ Skills - Lifelong Learning
Every web developer is well-acquainted with the dual challenge of form validations - the need to safeguard the user experience with client-side validations, and the imperative to protect your database with server-side validations. This double-edged sword, while critical, often results in hours of repetitive and error-prone coding.
But what if there was a solution that could effortlessly streamline this process? What if you could tackle both these concerns with a single piece of code?
Enter Remult - a framework that transforms the way we approach full-stack typescript and form validations. No more coding twice; with Remult, you define once and use everywhere. In this article, we'll journey into the realm of Remult, turning the traditionally daunting task of form validations into a seamless and efficient process, and dealing with a nightmare called the Date field. All of this, while combining Remult with the well-known React form packages: Formik and React-Hook-Form. Buckle up and let's dive in!
Configuring Remult
Remult team wrote a great documentation (I've even reviewed and edited some pieces). Here we will start with the quick setup, of cloning a starting project.
git clone https://github.com/remult/react-vite-express-starter.git remult-form-validation
cd remult-form-validation
npm install
This project includes the basic setup of Remult, with React running on vite & Express.
To run the project, we need to use both scripts:
# for running the client side (React)
npm run dev

# for running the server side (Express)
npm run dev-node
Defining an Entity and Field Validations
Remult's Entity is served as a model class, for both client-side and server-side code. We would like to test the behavior of string, boolean, and date attributes. Hence, we will define a "Person" entity with these fields: firstName and lastName (string), isMarried (boolean), and birthDate (date).
Here we'll define also the field validators, for both client and server in just a piece of code.
Create a shared/Person.ts file on the src folder as follows:
import { Fields, Entity, Validators } from "remult";

@Entity("person", { allowApiCrud: true })
export class Person {
  @Fields.string<Person>({
    validate: (person) => {
      if (person.firstName.length < 3) throw Error("too short");
    },
  })
  firstName = "";

  @Fields.string({ validate: Validators.required })
  lastName = "";

  @Fields.boolean({
    validate: (person) => {
      if (person.isMarried) throw Error("must be false");
    },
  })
  isMarried = true;

  @Fields.dateOnly({
    validate(person) {
      if (person.birthDate > new Date()) throw Error("must be in the past");
    },
  })
  birthDate = new Date();
}
and register the new entity on server/api.ts.
//src/server/api.ts

import { remultExpress } from "remult/remult-express";
import { Person } from "../shared/Person";

export const api = remultExpress({
  entities: [Person],
});
From here, when we kick up the server, the CRUD routes will be created on the fly under the main /api route:
$ npm start dev-node
--> [remult] /api/person
--> Server started
Testing The Validation On The Server Side
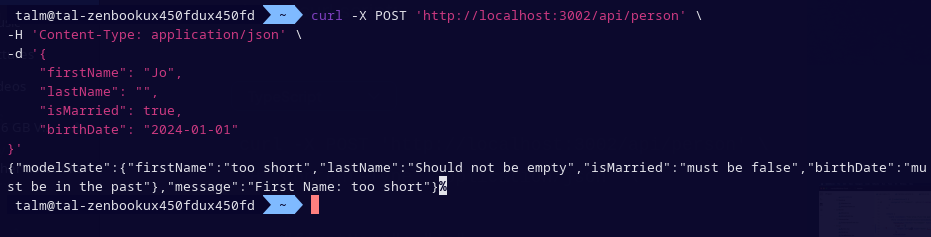
Let's see the validations on action on the server side. We can test it with Postman or a simple curl script:
curl -X POST 'http://localhost:3002/api/person' \
-H 'Content-Type: application/json' \
-d '{
    "firstName": "Jo",
    "lastName": "",
    "isMarried": true,
    "birthDate": "2024-01-01"
}'
None of these attributes are valid. And that's the response from the server:
The Quagmire of 'Date' in JavaScript and HTML
HTML, while offering a 'date' input type, deceivingly deals with these as strings formatted as dates, not actual date objects. This subtle discrepancy can become a thorn in developers' sides when working with JavaScript, which has its own quirks with date handling.
Adding to this complexity, popular form management libraries like Formik or React Hook Form fall short in this area, and does not cover all the edge cases of Date as an initial value, onChange, etc... This often results in developers being caught in a tangle of manual conversions between strings and Date objects, timezone inconsistencies, and off-by-one errors.
However, this is where the Remult package shines, providing an efficient solution to manage dates in forms. It solves it by two functions: fromInput and toInput, which encapsulates the endless casting between strings and dates. We will see it in action in the examples.
Building The Frontend Form - React Hook Form
So let's see how it is solved by React Hook Form. We are just building a form for Person's fields, and combining the validate function by Remult to validate the form on blur and on submit:
//src/App.tsx

import { remult } from "remult";
import { Person } from "./shared/Person";
import { useForm } from "react-hook-form";

const repo = remult.repo(Person);

function App() {
  const {
    register,
    handleSubmit,
    formState: { errors },
  } = useForm<Person>({
    mode: "all",
    defaultValues: {
      ...new Person(),
      birthDate: repo.fields.birthDate.toInput(new Date()) as any,
    },
    resolver: async (values) => {
      const errors = await repo.validate(values);
      if (errors && errors.modelState)
        return {
          values,
          errors: Object.fromEntries(
            Object.entries(errors.modelState).map(([key, value]) => [
              key,
              { message: value },
            ])
          ),
        };
      return { values, errors: {} };
    },
  });
  const onSubmit = async (values: Person) => {
    await repo.insert(values);
  };

  return (
    <div>
      <form onSubmit={handleSubmit(onSubmit)}>
        <div>
          <label htmlFor="firstName">First Name</label>
          <input {...register("firstName")} />
          <span>{errors.firstName?.message}</span>
        </div>
        <div>
          <label htmlFor="lastName">Last Name</label>
          <input {...register("lastName")} />
          <span>{errors.lastName?.message}</span>
        </div>
        <div>
          <label htmlFor="isMarried">Is Married</label>
          <input type="checkbox" {...register("isMarried")} />
          <span>{errors.isMarried?.message}</span>
        </div>
        <div>
          <label htmlFor="birthDate">Birth Date</label>
          <input
            type="date"
            {...register("birthDate", { valueAsDate: true })}
          />
          <span>{errors.birthDate?.message}</span>
        </div>
        <button type="submit">Submit</button>
      </form>
    </div>
  );
}

export default App;
Notes:
About
birthDatedefault value- as discussed, HTML expected toyyyy-mm-ddstring as a value, and bytoInputfrom Remult we converted the date to this shape. Typescript doesn't love this idea, because it expected birthDate to be a date and not a string.The other option is to leave the
defaultValuesto justnew Person(), but thebirthDateinitialValue won't be shown.the
resolverin RHF is the validation function that runs on blur and before the form submission. the resolver expects to return this format:// React Hook Form resolver- return type { fields: {firstName: "Remult", ...}, errors: {firstname: {message: "blah blah"},... } }That's why we're using
mapthere.Using
valueAsDatein the birthDate input field is solve the problem of string-to-date casting, and we're getting date values as expected.The rest is the regular React Hook Form package, using
registerto spill the attributes for theinputfields.When we submit the form, Remult's default behaviour is to save the data as a JSON file in a new
dbfolder, inside the root. Follow the docs to easily connect your DB.
Building The Frontend Form - Formik
Let's do that with Formik. The main change is that Formik doesn't support valueAsDate under the hood. Consequently, we need to build a special component for the birthDate field, using the useField and useFormikContext hooks.
Let's take a look at the birthDate field component:
//src/App.tsx

const BirthDateField = () => {
  const { setFieldValue } = useFormikContext();
  const [field] = useField("birthDate");
  return (
    <input
      {...field}
      value={repo.fields.birthDate.toInput(field.value)}
      type="date"
      onChange={(e) => {
        setFieldValue(
          field.name,
          repo.fields.birthDate.fromInput(e.target.value)
        );
      }}
    />
  );
};
As you can see, Remult's toInput and fromInput saves the day with convenient casting between dateString and real dates.
Now, let's use it on the whole form:
import { remult } from "remult";
import { Person } from "./shared/Person";
import {
  ErrorMessage,
  Field,
  Form,
  Formik,
  useField,
  useFormikContext,
} from "formik";

const repo = remult.repo(Person);

function App() {
  return (
    <div>
      <Formik
        initialValues={new Person()}
        onSubmit={async (values) => {
          await repo.insert(values);
        }}
        validate={async (values) => {
          const errors = await repo.validate(values);
          if (errors && errors.modelState) return errors.modelState;
          return {};
        }}
      >
        <Form>
          <div>
            <label htmlFor="firstName">First Name</label>
            <Field name="firstName" />
            <ErrorMessage name="firstName" component="span" />
          </div>

          <div>
            <label htmlFor="lastName">Last Name</label>
            <Field name="lastName" />
            <ErrorMessage name="lastName" component="span" />
          </div>

          <div>
            <label htmlFor="isMarried">Is Married</label>
            <Field type="checkbox" name="isMarried" />
            <ErrorMessage name="isMarried" component="span" />
          </div>

          <div>
            <label htmlFor="birthDate">Birth Date</label>
            <BirthDateField />
            <ErrorMessage name="birthDate" component="span" />
          </div>

          <div>
            <button type="submit">Submit</button>
          </div>
        </Form>
      </Formik>
    </div>
  );
}
Notes:
We initialize the values just with
new Person(), and ourBirthDateFieldcomponent takes care of the string-to-date casting, when viewing the initial value and when editing it.The
validatefunction, in this case, excepts a return type similar to Remult'serror.modelState.Again, when we submit the form, Remult is configured by default to save the data as a JSON file in a new
dbfolder, inside the root. Follow the docs to easily connect your DB.
Conclusion
The journey of form validation, while fraught with complexity, can indeed be made more efficient and less error-prone with the right tools. Remult is a game-changer for web developers, offering a unified framework to handle both client-side and server-side validations.
By allowing you to define once and use everywhere, it eliminates redundancy and streamlines your workflow. With its intelligent handling of JavaScript's date complexities, it addresses a notorious pain point in form validations, offering seamless integration with popular React form packages like Formik and React Hook Form.
Source Code
To get the full example source code as discussed here, Follow this repo
Or this CodeSandBox:
